
Learning how to make pastry dough is one of the most useful skills in French cooking. Once you've mastered a few simple techniques, you'll be able to create everything from rustic quiches and savory pies to elegant fruit tarts and delicate desserts.
The good news? Making pastry from scratch isn't nearly as difficult as many people think. You don't need to be a professional pastry chef, just good ingredients, a little patience, and a few helpful tips.
More wonderful French pastries that are much easier than you think, learn how to make Puff Pastry for appetizers and easy profiteroles with choux pastry.

In this article, we will look at the shortcrust pastry and its three main recipes.
Of course, this all depends on the baker and how she or he prefers to vary from the original mix!
Jump to:
The Three Essential French Pastry Doughs
French baking relies on three classic shortcrust pastries. Each has its own texture and purpose, making it perfect for different recipes.
- Pâte Brisée
Pâte brisée is the traditional French shortcrust pastry. It has a tender, flaky texture and is wonderfully versatile.
Because it contains very little sugar, it complements both savory and lightly sweet recipes beautifully.
It's the ideal choice for:
Savory pies: French Onion Tart
Quiches: Seafood Quiche Recipe
Meat pies: Pork Apple Pie with Chestnuts
Vegetable tarts: Best Spinach Quiche Recipe
Fruit pies with juicy fillings such as plums or berries: Easy Plum Tart - Pâte Brisée Sucrée
This sweet version of pâte brisée contains a little sugar, creating a slightly richer pastry that's perfect for desserts.
It provides just enough sweetness without overpowering the filling.
Make this excellent sweet French pastry crust following the tips given in this post.
Use it for:
Lemon tarts: Citron Tart
Strawberry tarts: No-bake Cream Strawberry Tarts
Raspberry tarts: Raspberry Tarts with Crème Pâtissière
Apple tarts: Easy Apple Tart Recipe
Fresh fruit desserts: French Tarte Tatin - Pâte Sablée
Pâte sablée is richer and more delicate than the other two pastries. Once baked, it has a wonderfully crisp, almost biscuit-like texture that melts in your mouth.
Because it's more fragile, it's usually reserved for sweet pastries where its buttery flavour can really shine.
It's perfect for:
Elegant fruit tarts
Chocolate tarts
Custard tarts
Individual tartlets
Dessert pizzas
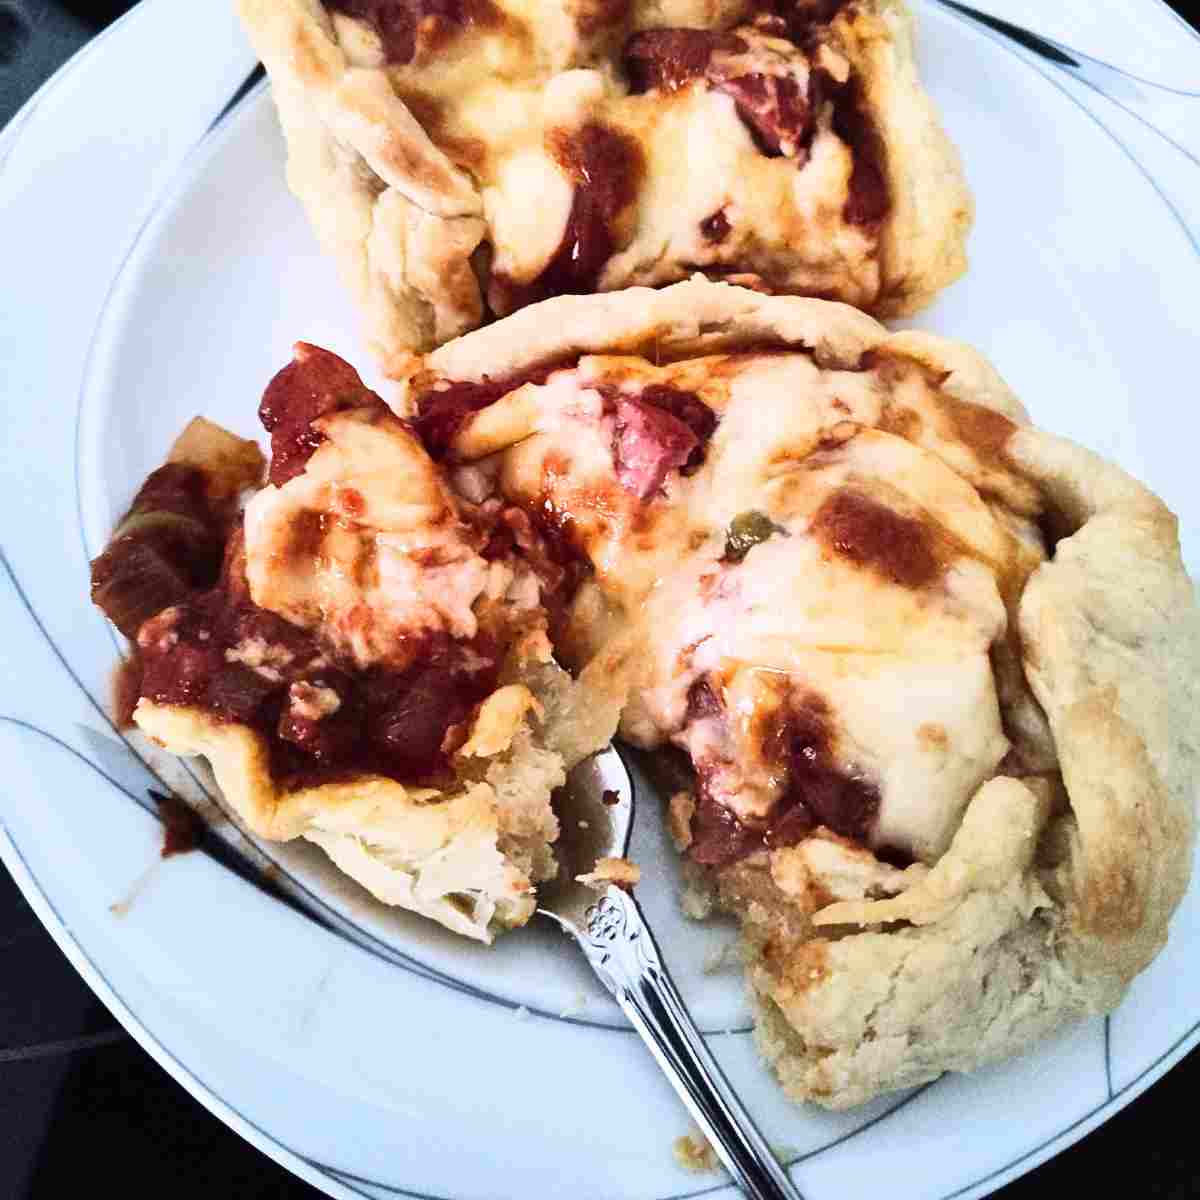
I have to admit, though, leftover dough works very well for quick, savory pizza galette-style snacks!
My Best Tips for Perfect Pastry Every Time
Great pastry is less about complicated techniques and more about following a few simple rules.
Keep Everything Cold
Cold butter creates tiny pockets of steam as the pastry bakes, giving you those lovely flaky layers everyone loves. If your kitchen is warm, chill your mixing bowl and flour beforehand.
Don't Overwork the Dough
Mix the ingredients only until the dough comes together. Overmixing develops gluten, which makes pastry tough instead of tender.
Rest the Dough
Wrap the dough and refrigerate it for at least 30 minutes before rolling. Resting relaxes the gluten, making the pastry easier to handle and helping prevent shrinkage during baking.
Use Just Enough Flour
Dust your work surface lightly. Too much extra flour can dry the pastry and make it less tender.
Roll Evenly
Turn the dough a quarter turn every few rolls to help maintain an even thickness and prevent sticking.
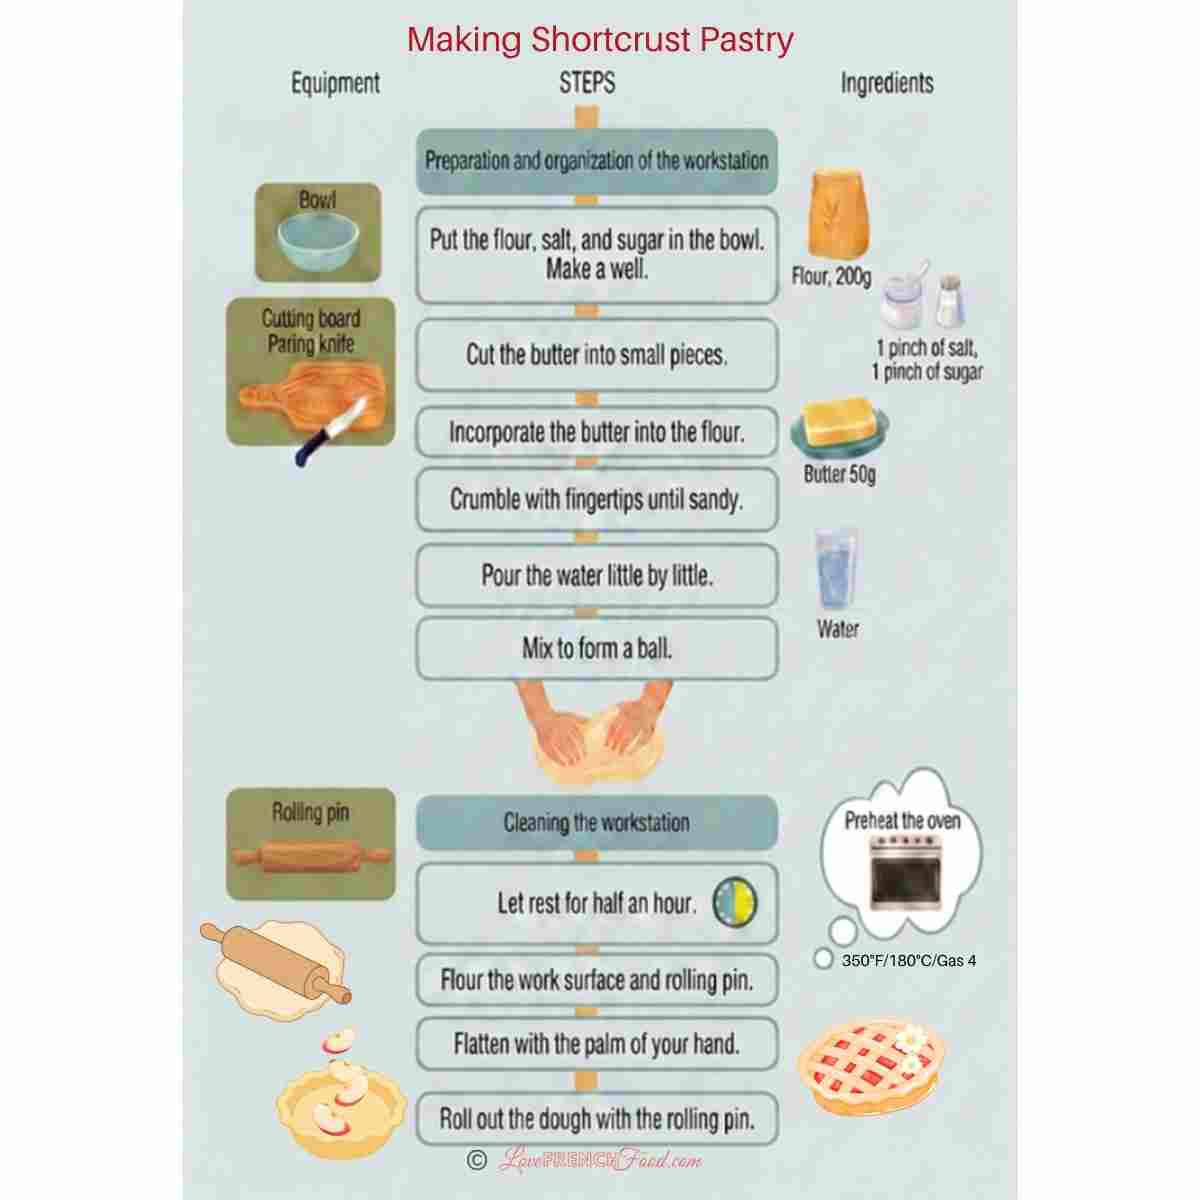
Homemade Pastry Is Worth It
Once you've made pastry from scratch a few times, you'll wonder why you ever bought it ready-made.
The flavour is richer, the texture is lighter, and the satisfaction of serving a beautiful homemade tart or quiche is hard to beat.
With these three classic French pastry doughs in your repertoire, you'll be ready to bake everything from rustic family meals to elegant desserts with confidence.
More French Pastry Doughs To Make:
For delicate and lighter sweets or savory treats, learn how to make Puff Pastry for appetizers and easy profiteroles with choux pastry.
Secrets For Making Foolproof French Pastry Recipes
- For all French pastry recipes, the ingredients are so important. We need to get it right. The French use a special low-gluten flour, but you can produce a good pastry using all-purpose flour if you cannot buy French flour.
- The French also use unsalted butter, and this gives a crisp texture, but you can use three parts butter to one part vegetable fat, which produces a light, crisp pastry to be proud of.
- You can either make your pastry by hand or in a food processor. However, it is really a good idea to make it by hand, to begin with, so as to learn the skill of making a good pastry, to get the feel of the pastry in your hands, and to learn the basics first. "Il faut mettre la main à la pâte!" Get your hands dirty!
- The most important part of making all French pastries is the hand mixing. You must work quickly and not handle the dough too long. This is to prevent it from getting warm, as you do not want the butter to soften too much. So, work with light fingers and very quickly.
- If you choose to make your pastry recipes in a food processor, do not overdo it; just mix for a short time, or the pastry will be hard.
How To Get The Dough Into The Pastry Pan Successfully
- Preheat the oven to 375°F/191°C/Gas 5.
- Prepare your flan tin by lightly greasing it if that is what you are using.
An 8-inch flan tin is suitable for most flans or quiches. Choose smaller ones for individual tarts, etc. A straight-sided flan tin with a loose bottom is the best (more traditional) to use for a quiche.
If using a pie pan that is made of stoneware, there is no need to grease it. - Roll out your pastry just a little larger than the flan tin. To do this, you can reverse roll the pastry onto the rolling pin, hoping it won't break! But no worries if it does, just lightly press it back together.
- Or you can fold it in half, lay it in the tin, and unfold it. Use your fingers to lift the edges of the pastry and let it fill the entire tin.
- Gently press the pastry into the tin to line the base and sides. When you've pressed it all around with your fingers (not finger tips, because this may puncture the pastry).
I use my knuckles, too, to ease the dough into the bottom corners. Lifting the edges that hang over the tin to ease it down the sides is helpful to avoid stretching the dough, which will create shrinking when baking.
Once the pan is covered nicely with the dough, try to ease back down any pastry that is sticking up above the edges, so that you reinforce the edge. Make sure there are no large holes in the bottom, or the filling will leak through! - You can use your rolling pin to roll over the top of the tin to trim off the edges. You can, of course, use a knife if you prefer.
- At this stage, make a decorative edge around the rim if you're feeling artistic. To inspire you, try one of Craftsy's ideas. https://www.craftsy.com/post/pie-crust-edges/.
- Prick the bottom of the pastry case with a fork, which will keep the dough from ballooning up while baking.
- At this stage, you have a choice to prevent the bottom of the pastry case from puffing up/ballooning when cooking.
- Baking blind: Fill the pastry case with a round of baking paper and add baking beans (you can purchase ceramic baking beans in kitchen supply stores or from Amazon) to weigh the bottom crust down.
OR - Brush the base and sides all over with beaten egg, which will provide a sort of waterproof coating so that the pastry stays beautifully crisp even after the filling has gone in.
- Place in your preheated oven for about 8 minutes if it only needs to be partially baked, or 20-25 minutes, or until browned for a fully cooked. Keep an eye on it through the window. Resist the urge to open the oven and let out the heat.
- Remove from the oven, remove the paper and beans. Place the shell back in the oven for about 2 minutes more (just starting to turn light brown on the edges).
- This is your partially cooked pastry shell.
- For a fully cooked pastry shell, continue baking for another 5-10 minutes or until the pastry is a golden-brown color.
Prep Like a Pro
Before you start cooking, chop, measure, and prep every ingredient, and gather your tools.
This simple habit reduces stress, prevents overcooking, and instantly improves your meals. Mise en Place - "Everything in its place."
How To Make Pastry Dough Like A French Chef
Notes
- Savory pies: French Onion Tart
This sweet version of pâte brisée contains a little sugar, creating a slightly richer pastry that's perfect for desserts. It provides just enough sweetness without overpowering the filling.
Use it for:
- Lemon tarts: Citron Tart
- Strawberry tarts: No-bake Cream Strawberry Tarts
- Raspberry tarts: Raspberry Tarts with Crème Pâtissière
- Apple tarts: Easy Apple Tart Recipe
- Fresh fruit desserts: French Tarte Tatin
3. Pâte Sablée:
Pâte sablée is richer and more delicate than the other two pastries. Once baked, it has a wonderfully crisp, almost biscuit-like texture that melts in your mouth. Because it's more fragile, it's usually reserved for sweet pastries where its buttery flavour can really shine.
It's perfect for: - Elegant fruit tarts
- Chocolate tarts
- Custard tarts
- Individual tartlets
- Dessert pizzas
- For all French pastry recipes, the ingredients are so important. We need to get it right. The French use a special low-gluten flour, but you can produce a good pastry using all-purpose flour if you cannot buy French flour.
- The French also use unsalted butter, and this gives a crisp texture, but you can use three parts butter to one part vegetable fat, which produces a light, crisp pastry to be proud of.
- You can either make your pastry by hand or in a food processor. However, it is really a good idea to make it by hand, to begin with, so as to learn the skill of making a good pastry, to get the feel of the pastry in your hands, and to learn the basics first. "Il faut mettre la main à la pâte!" Get your hands dirty!
- The most important part of making all French pastries is the hand mixing. You must work quickly and not handle the dough too long. This is to prevent it from getting warm, as you do not want the butter to soften too much. So, work with light fingers and very quickly.
- If you choose to make your pastry recipes in a food processor, do not overdo it; just mix for a short time, or the pastry will be hard.


Comments
No Comments